City of Bridges began its road trip to Paducah today, en route to the AQS Modern Quilt Challenge in Des Moines, Iowa! Sadly, I won't be able to make it to the show because I will be on a road trip of my own. So if you are able to make it to the show, please snap a picture of my quilt for me :)
My road trip is a little more extensive. I'll be helping my best friend move across the country at the end of the month - we'll basically be taking I-90 from Cleveland to Seattle over the course of a week. Our current list of things to see includes Taliesin, Mount Rushmore, Devil's Tower, and Glacier National Park. Anyone have any suggestions for other cool stops or good local places to eat along the way? If there are any great modern fabric shops, relatively close to the highway, I'd love to know about them, too! Thanks for the advice in advance :)
-Melissa

Wednesday, September 11, 2013
Friday, August 30, 2013
Swooning Over My New Fabric Storage
So last week, my grandma sent me a beautiful photo she found online of fabric stored on these nice shelves... since I had been storing all of mine in and on an old dresser that was falling apart. The drawers were overloaded, the bottom was sagging, and none of the doors could open or close without interfering with the drawer below it. Aggravating! And not pretty. And not a good way to actually see what's in your stash! With that photo in mind, I headed to Ikea to get an Expedit shelf. I took my brother along to do the heavy lifting and then a friend of mine helped me assemble it. It was way more difficult and time-consuming than we thought it would be, but we got it together. And it is awesome!! I could just sit and stare at all the pretty fabrics. It's like having a fabric shop in my apartment!
I've also made some great progress on my Timber and Leaf Swoon Quilt. The background is all quilted with paisley and I'm working on some fancy straight-line quilting on the stars. As soon as the background was finished, I couldn't wait any longer and had to square it up. What a difference! It looks so nice and crisp! And there's less bulk to shove through the machine while I'm doing the straight-line quilting. After the photo shoot, I machined-stitched the binding. There's still hours and hours of hand stitching ahead on that :)
Thank goodness it's a long weekend coming up - more time to work on finishing this up!
-Melissa
 |
| My stash is bigger than I realized... |
I've also made some great progress on my Timber and Leaf Swoon Quilt. The background is all quilted with paisley and I'm working on some fancy straight-line quilting on the stars. As soon as the background was finished, I couldn't wait any longer and had to square it up. What a difference! It looks so nice and crisp! And there's less bulk to shove through the machine while I'm doing the straight-line quilting. After the photo shoot, I machined-stitched the binding. There's still hours and hours of hand stitching ahead on that :)
 |
| All trimmed up! |
 |
| Ready for some more quilting and binding! |
Thank goodness it's a long weekend coming up - more time to work on finishing this up!
-Melissa
Sunday, August 11, 2013
More Bangles
I've been English paper piecing my hands off lately! I'm up to 31 completed bangles! My fingers are starting to hurt... I haven't decided on a completed size but this is probably less than 1/4 of the ultimate total for the quilt. This is supposed to be a project for when I can't use my machine...but I've been neglecting the machine in favor of working on this - it's addictive!
-Melissa
 |
| Bangles! |
Wednesday, July 31, 2013
Second Swoon
For several months, I've been working on my second Swoon quilt. The first one isn't finished. The top is together, there was some unpleasantness with fabrics not matching, and I don't feel Christmas-y enough to work on it.
I started on another, using fabrics from Timber & Leaf. Again, there are some issues with having the "same" gray but it's two different colors (one from a local shop, the other from an online shop, but they're the same color, same manufacturer, just different bolts - it's only really visible in sunlight, so it was too late when it was finally visible. sigh).
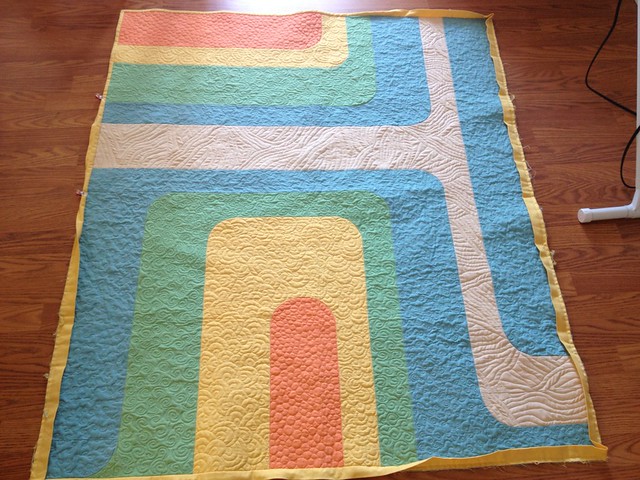
The top is all together and I'm working on the quilting! I started by stitching in the ditch around each star. Then I added some loops in the triangles - something I've always wanted to try. Not bad, for a first try! There's room for improvement, but overall, they're fine. I did have to use my chalk marker to draw the lines on first... So the photo is of the back side - the chalk isn't visible.
Then I started with the REAL free motion quilting! There was an opportunity to do some really neat things in the negative space between blocks, but I chickened out and decided to keep on with the paisley pattern - I'm getting pretty good at it!
I started on another, using fabrics from Timber & Leaf. Again, there are some issues with having the "same" gray but it's two different colors (one from a local shop, the other from an online shop, but they're the same color, same manufacturer, just different bolts - it's only really visible in sunlight, so it was too late when it was finally visible. sigh).
The top is all together and I'm working on the quilting! I started by stitching in the ditch around each star. Then I added some loops in the triangles - something I've always wanted to try. Not bad, for a first try! There's room for improvement, but overall, they're fine. I did have to use my chalk marker to draw the lines on first... So the photo is of the back side - the chalk isn't visible.
 |
| First try - not bad! |
Then I started with the REAL free motion quilting! There was an opportunity to do some really neat things in the negative space between blocks, but I chickened out and decided to keep on with the paisley pattern - I'm getting pretty good at it!
 |
| Paisley in the negative space |
There's still a lot of quilting left to do, and I need to figure out what to do with the stars themselves - straight lines to contrast with all the curvy quilting and accent the straight lines of the piecing?
 |
| It was windy... but you get the idea! |
Linking up with WIP Wednesday at Freshly Pieced!
-Melissa
Monday, July 22, 2013
Bangles
I've been M.I.A. for months now... Things have been busy and I felt like I'd rather be sewing than blogging about sewing. I've still got a huge pile of incomplete projects, but I started on a new one that I'm really loving!
This is my it's-too-nice-to-sew-inside or it's-too-hot-to-be-under-a-huge-quilt project. English paper piecing is just the perfect thing. I even took it camping over the weekend! The quilt is inspired by Sarah Fielke's Bangles quilt in her book Hand Quilted With Love.
I still haven't decided how big the quilt is going to be, but I'm thinking I would like to get it to be a good lap-size couch quilt. Depending on how long it takes me to tire of making bangles.
Back in the fall, a half-yard bundle of Simply Color made its way into my stash. A lot of it will be making its way into this quilt. Perhaps Simply Style will make it in there, too!
-Melissa
 |
| Bangles! |
This is my it's-too-nice-to-sew-inside or it's-too-hot-to-be-under-a-huge-quilt project. English paper piecing is just the perfect thing. I even took it camping over the weekend! The quilt is inspired by Sarah Fielke's Bangles quilt in her book Hand Quilted With Love.
 | |
| Photo borrowed from Sarah's website where you can buy templates. |
I still haven't decided how big the quilt is going to be, but I'm thinking I would like to get it to be a good lap-size couch quilt. Depending on how long it takes me to tire of making bangles.
Back in the fall, a half-yard bundle of Simply Color made its way into my stash. A lot of it will be making its way into this quilt. Perhaps Simply Style will make it in there, too!
-Melissa
Tuesday, May 21, 2013
Taking a Breath
It's been a while since I've blogged! Things have been a little hectic the last few months and I decided I wanted to focus more on sewing than on blogging. And I've also started to focus a little more on organizing! And that can work out to your benefit...I'm destashing!
Hop on over to the ClassyQuilts shop on Etsy if you want to add some fun fabrics to your stash! There are only a few items in the shop so far, but I've got tons more to list (like paper grocery bag full of stuff). I will be on vacation at the beginning of June, so things will be quiet for a couple weeks, but I'll continue to post/ship more items when I get back!
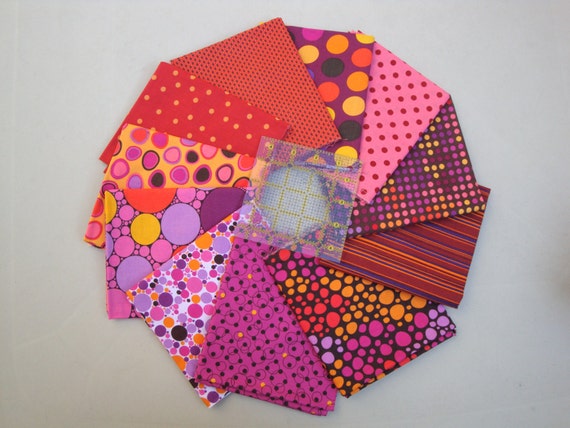
The dots above are a 1/3 yard bundle with some extra in the stripes. I almost don't want to get rid of them, but I think one of you had the perfect project for them!
Some fabrics are from quilt shops, others are from big box stores, many of them don't have selvedges so I'm not really sure what they are! But there will be plenty to choose from. Smaller bits of fat quarter size or less will be posted in color-coordinated bundles, there will be a little bit of yardage, and some precuts.
I hope you find something you love! Check back often as the destash pile will be growing...and growing...and growing...
-Melissa
Hop on over to the ClassyQuilts shop on Etsy if you want to add some fun fabrics to your stash! There are only a few items in the shop so far, but I've got tons more to list (like paper grocery bag full of stuff). I will be on vacation at the beginning of June, so things will be quiet for a couple weeks, but I'll continue to post/ship more items when I get back!
 |
| Just one of the items available in the shop! |
The dots above are a 1/3 yard bundle with some extra in the stripes. I almost don't want to get rid of them, but I think one of you had the perfect project for them!
Some fabrics are from quilt shops, others are from big box stores, many of them don't have selvedges so I'm not really sure what they are! But there will be plenty to choose from. Smaller bits of fat quarter size or less will be posted in color-coordinated bundles, there will be a little bit of yardage, and some precuts.
I hope you find something you love! Check back often as the destash pile will be growing...and growing...and growing...
-Melissa
Friday, March 15, 2013
Winners and Some Groovy FMQ
Important business first. I'd like to welcome all of the new followers who joined during the blog hop - hope you enjoy reading along! The winner of the birthday giveaway Twenty-Three charm pack is Debra Lee and the winner of the Celebrations sushi roll is Deb. No, I wasn't going through choosing people with similar names, Random.org somehow managed to do that work for me! :) Thanks to everyone who entered and I hope you had a great time on the blog hop!
I've been really busy hand sewing lately - today or tomorrow I will be dropping off my two quilts for the Three Rivers Quilt show, so I had to get sleeves on them and get them all de-linted/-haired/-threaded. I made the mistake of making my first sleeve totally flat. Bad idea. It makes the top of my quilt look all bendy and funny. Luckily some friends gave me some advice and I ended up making the second one in the vein of this D-Sleeve Tutorial from Tallgrass Prairie Studio. My hands are cramping up after all that hand sewing!
My absolute favorite thing from this past week was finishing up the FMQ on my Groove quilt. I decided to go back to my original thought of doing "organic, wavy lines" and tried that out over the final section of the quilt. I loooooove it!
Now to continue attaching the binding... Oh and never again will I get hasty and decide I'm done before I'm actually done and then have to quilt with it already trimmed with the binding on. Getting around the edges was soooo difficult! There was basically nothing to hold on to. But it's so busy, nobody will ever notice :)
After finishing that up, I'm feeling pretty confident in my FMQ skills. I recently basted my Parking Lights quilt from last summer and will be quilting up that beast soon. That was going to be my entry for Quilt Con. Ooops. Maybe for 2015!
Linking up with FMQ Friday!
-Melissa
I've been really busy hand sewing lately - today or tomorrow I will be dropping off my two quilts for the Three Rivers Quilt show, so I had to get sleeves on them and get them all de-linted/-haired/-threaded. I made the mistake of making my first sleeve totally flat. Bad idea. It makes the top of my quilt look all bendy and funny. Luckily some friends gave me some advice and I ended up making the second one in the vein of this D-Sleeve Tutorial from Tallgrass Prairie Studio. My hands are cramping up after all that hand sewing!
My absolute favorite thing from this past week was finishing up the FMQ on my Groove quilt. I decided to go back to my original thought of doing "organic, wavy lines" and tried that out over the final section of the quilt. I loooooove it!
 |
| Quilting finished! Finally! |
After finishing that up, I'm feeling pretty confident in my FMQ skills. I recently basted my Parking Lights quilt from last summer and will be quilting up that beast soon. That was going to be my entry for Quilt Con. Ooops. Maybe for 2015!
Linking up with FMQ Friday!
-Melissa
Friday, March 8, 2013
Blog Hop with Giveaways
Spring is just around the corner - it's time to get ready with the Beat the Winter Blues Blog Hop Party with Giveaways! I'm giving away something that will prepare you for next winter. A Princess Mirah Designs Sushi Roll in Celebrations!

It's a batik roll with 24 strips (2.5" wide) with various red, green, and gold designs. Combine this with some solids and you can make a really stunning holiday quilt. Or take out the yellow/gold/green strips and use them in a springy project!


It's a batik roll with 24 strips (2.5" wide) with various red, green, and gold designs. Combine this with some solids and you can make a really stunning holiday quilt. Or take out the yellow/gold/green strips and use them in a springy project!
Be sure to check out the blog hop and enter some of the other giveaways!
To enter the giveaway, just leave a comment below. Followers of my blog get a bonus entry - just leave a separate comment letting me know you follow (through Google or RSS or whatever). The giveaway will be open through noon eastern on Friday, March 15 and is open to everyone, US and international. I will pick a comment at random. Please be sure to leave an e-mail address if your profile is set to "no reply". Good luck!
-Melissa
Friday, March 1, 2013
TRQ and Some FMQ
Right before the deadline, I submitted my first ever quilt show entry to the Three Rivers Quilt Show. I put in two quilts: Charming Stars and City of Bridges. This week, I got a letter in the mail that they were both accepted!!

This is the first time I ever submitted anything for a show and it's a good feeling to get in. Fellow Pittsburgh-based quilter/blogger Michelle from My Life As Michelle also has a quilt in the TRQ show! And I'm super thankful that she can pick my quilts up for me after the show because I'm supposed to be in two OTHER places at that exact same time. Thanks Michelle! She's also going to be showing one of her provocative pin-up girl quilts in Boston this month.
And this morning I got the Designer Bump (it's like the Colbert Bump, only for fabric-related blog posts haha) when Kate Spain shared my Honey Honey quilt blog post on Facebook! Thanks Kate!
My other excitement from this past week is that I'm finally getting to be decent at FMQ! I've been slowly (very very slowly) working on my Groove quilt. As the wonderful Leah Day suggested, I got a thread stand. Suddenly my tension seems to be mostly in check. I was really on a roll but then I ran out of thread in the correct colors...

You can see the orange pebble quilting, the yellow fan/paisly type quilting, the green is a swirl that I'm not crazy about and haven't mastered, and the blue is a loopy design.

See how crummy the tension was on the back before? It's really obvious with the light yellow thread on the blue. Yuck!

Through a combination of practice, different brand of thread, and a thread stand, my tension is SO much more balanced, as you can see in the loopy blue design above.
I'm really excited to finish this up and see how it looks after it is washed :)
Linking up with FMQ Friday - hop over and take a look at Leah Day's gorgeous quilt. I can't even imagine how tedious it must be to do alllll that stitching! But it's so worth the results.
-Melissa
This is the first time I ever submitted anything for a show and it's a good feeling to get in. Fellow Pittsburgh-based quilter/blogger Michelle from My Life As Michelle also has a quilt in the TRQ show! And I'm super thankful that she can pick my quilts up for me after the show because I'm supposed to be in two OTHER places at that exact same time. Thanks Michelle! She's also going to be showing one of her provocative pin-up girl quilts in Boston this month.
And this morning I got the Designer Bump (it's like the Colbert Bump, only for fabric-related blog posts haha) when Kate Spain shared my Honey Honey quilt blog post on Facebook! Thanks Kate!
My other excitement from this past week is that I'm finally getting to be decent at FMQ! I've been slowly (very very slowly) working on my Groove quilt. As the wonderful Leah Day suggested, I got a thread stand. Suddenly my tension seems to be mostly in check. I was really on a roll but then I ran out of thread in the correct colors...
You can see the orange pebble quilting, the yellow fan/paisly type quilting, the green is a swirl that I'm not crazy about and haven't mastered, and the blue is a loopy design.
See how crummy the tension was on the back before? It's really obvious with the light yellow thread on the blue. Yuck!
Through a combination of practice, different brand of thread, and a thread stand, my tension is SO much more balanced, as you can see in the loopy blue design above.
I'm really excited to finish this up and see how it looks after it is washed :)
Linking up with FMQ Friday - hop over and take a look at Leah Day's gorgeous quilt. I can't even imagine how tedious it must be to do alllll that stitching! But it's so worth the results.
-Melissa
Wednesday, February 27, 2013
Honey Honey Quilt Top
For the past few weeks I've been hard at work on some old projects that have been lying around just waiting to be finished. I also decided to start something new! I recently purchased a jelly roll of Kate Spain's newest line, Honey Honey, and just had to make something with it. All the bright springy floral prints made me forget about winter for a while!
It's still untitled. I'm waiting for some inspiration to strike for a good name - suggestions are welcome! It's approximately 64" x 84" although I haven't actually measured it and I'm apparently terrible at making a scant 1/4" seam. You can kind of see that when I trimmed the bottom, I had to lop off a good bit of that bottom square. Oh well. That's how you know it's handmade, right?
 |
| Half of a quilt top! |
It's still untitled. I'm waiting for some inspiration to strike for a good name - suggestions are welcome! It's approximately 64" x 84" although I haven't actually measured it and I'm apparently terrible at making a scant 1/4" seam. You can kind of see that when I trimmed the bottom, I had to lop off a good bit of that bottom square. Oh well. That's how you know it's handmade, right?
 |
| Honey Honey Quilt Top |
I'm hoping to get it basted in the next week so it can actually be in use during the spring! I'm thinking of going for a solid on the back and a solid binding. There are so many beautiful colors in this line, it's hard to decide which ones to use! These pictures really don't do it justice - the next sunny day I will try to get some good photos!
If you're looking for the giveaway (who wants a charm pack!?), you can find that here.
Linking up to WIP Wednesday - be sure to click the button on the right and check out the rest of the awesome projects this week!
-Melissa
Monday, February 25, 2013
A Finish and a *Giveaway*
I recently finished up my Lucky Square quilt! Out To Sea was a perfect selection for this pattern, it turned out even better than I had imagined :) I picked up the fabric on a whim at Wexford Dry Goods (if you're in the Pittsburgh area, check it out - there's a huge selection of solids and some really great prints, too!) and found the right project for it! The sun was still out a little bit when I got home today, so here's the photo shoot.
Thanks to Lauren for suggesting the striped binding! It turned out to be super cute! I was worried about having to patch together a bunch of different colors, but I think it looks really fun.
The quilt was finished up just in time - one of my good friends was pregnant and I figured I had some time (she's not due until sometime around the end of March) to get this surprise finished up. But the little one arrived on Thursday! So it's time to get this labeled and washed!
Now for what everyone's been waiting for... a giveaway! My birthday is coming up next Monday and I want to celebrate by sending one of you a present! I've pulled a charm pack of Twenty Three out of my stash for one lucky reader!
All you have to do is leave a comment on this post! A comment about anything at all. If you can't think of something, tell me a funny birthday story. And if you follow my blog, you get an extra entry (just leave a separate comment telling me you're a follower, new or old). And if you really want a third entry, spread the news about this giveaway via Twitter, Facebook, your blog, or whatever. I'll pick someone at random on Monday, March 4.
Good luck!
-Melissa
 |
| Lucky Square in Out To Sea |
 |
| The back |
 |
| Closeup of the back |
 |
| So proud of the corners :) |
The quilt was finished up just in time - one of my good friends was pregnant and I figured I had some time (she's not due until sometime around the end of March) to get this surprise finished up. But the little one arrived on Thursday! So it's time to get this labeled and washed!
Now for what everyone's been waiting for... a giveaway! My birthday is coming up next Monday and I want to celebrate by sending one of you a present! I've pulled a charm pack of Twenty Three out of my stash for one lucky reader!
 |
| ...this could all be yours! |
Good luck!
-Melissa
Tuesday, February 19, 2013
Determination
Some days your left middle finger is the salmon and your sewing machine is the bear. Especially days when you are determined to finish a quilt top. Maybe it will be finished by the weekend now...

I'm really not even sure how it happened, but I somehow managed to sew the left side of my left middle finger last night. You'd think it would be the index finger... My machine was in the "needle down" position so it took me a minute to figure out how to get unstuck! It's all a blur. Luckily it missed the nail and the bone and came out the side. And luckily I have a good roommate who made sure I didn't pass out and brought me ice to put on it! And luckily my tetanus booster is up to date!
So if you ever sew your finger, just remember you're not the only one! If you Google "I sewed my finger" there are a lot of hits! Haha
-Melissa
Wednesday, February 13, 2013
T-Shirt Quilt: Finished!
The t-shirt quilt is finally finished up! And I got to use a clothesline to take photos yesterday while it was somewhat sunny out! Unfortunately, the clothesline is in a valley that doesn't get much sun on winter afternoons, but at this time of year, who can complain about even THIS much light?? :)
As I mentioned before, this quilt is for Pete, a good friend of mine from college. He lost his brother to cancer several years ago and asked me if I could make a t-shirt out of his brother's old shirts. I was scared - the main quilt material is really a priceless, irreplaceable thing! Plus, I'm not generally a fan of t-shirt quilts - usually they're just too busy. But the solid t-shirts turned out to be really nice! I used fusible interfacing on each shirt to stabilize them (I recently found even lighter weight interfacing than used on the shirts - it would probably give it a better drape with the thinner stuff, but this will be a nice cozy couch blanket). Pete designed the quilt layout himself and I think it's fantastic with the color gradient! The center block is his brother's hockey jersey and the block on the upper right is the Team M-Power logo. The team has participated in many LiveStrong challenges, thousands and thousands of dollars for the cancer charity.
I was really nervous about using the hockey jersey. At least with the t-shirts, I could fudge something if I screwed up cutting. If I screwed up cutting the hockey jersey, it could be problematic. And I was worried it would melt when I put the interfacing on it. And I was worried about quilting it. It turned out to not be nearly as much of a big deal as I anticipated! I avoided sewing over the numbers and just quilted around them. They seemed too stiff for the needle to effectively go through them.
The quilt sashing and backing are Kona Basil and the binding is Kona Khaki. I hand stitched the binding then machine top stitched, just for extra security. Plus I think it looks nice with the extra detail.
Overall, I'm really pleased with it. And it's a great "guy" quilt! I always find everything I make being a little on the feminine side. Not this quilt!
So now the big question is, "How the heck do I get this to Delaware?" I'm not going there any time soon. I've never mailed a quilt before. I'm so scared that it will be damaged or lost! What's the best method? US Mail, UPS, FedEx? What's the most reasonable price? What's the best way to package it? Any feedback would be much appreciated!
-Melissa
 |
| Pete's T-shirt Quilt |
As I mentioned before, this quilt is for Pete, a good friend of mine from college. He lost his brother to cancer several years ago and asked me if I could make a t-shirt out of his brother's old shirts. I was scared - the main quilt material is really a priceless, irreplaceable thing! Plus, I'm not generally a fan of t-shirt quilts - usually they're just too busy. But the solid t-shirts turned out to be really nice! I used fusible interfacing on each shirt to stabilize them (I recently found even lighter weight interfacing than used on the shirts - it would probably give it a better drape with the thinner stuff, but this will be a nice cozy couch blanket). Pete designed the quilt layout himself and I think it's fantastic with the color gradient! The center block is his brother's hockey jersey and the block on the upper right is the Team M-Power logo. The team has participated in many LiveStrong challenges, thousands and thousands of dollars for the cancer charity.
 |
| The only printed shirt in the whole quilt! |
I was really nervous about using the hockey jersey. At least with the t-shirts, I could fudge something if I screwed up cutting. If I screwed up cutting the hockey jersey, it could be problematic. And I was worried it would melt when I put the interfacing on it. And I was worried about quilting it. It turned out to not be nearly as much of a big deal as I anticipated! I avoided sewing over the numbers and just quilted around them. They seemed too stiff for the needle to effectively go through them.
 |
| A nice backwards "13" on the back |
The quilt sashing and backing are Kona Basil and the binding is Kona Khaki. I hand stitched the binding then machine top stitched, just for extra security. Plus I think it looks nice with the extra detail.
 |
| Blowing in the wind... |
Overall, I'm really pleased with it. And it's a great "guy" quilt! I always find everything I make being a little on the feminine side. Not this quilt!
So now the big question is, "How the heck do I get this to Delaware?" I'm not going there any time soon. I've never mailed a quilt before. I'm so scared that it will be damaged or lost! What's the best method? US Mail, UPS, FedEx? What's the most reasonable price? What's the best way to package it? Any feedback would be much appreciated!
-Melissa
Thursday, February 7, 2013
Timber & Leaf
I recently purchased a half yard bundle of Timber & Leaf (Blend Fabrics) to make a quilt for my aunt and I'm not quite sure what to do with it!
The color is slightly off in the photo - the sun was nearly gone. It's sitting on white snow so use your imagination :)
I'm thinking of combining these with some solids and a cream/natural background and doing another Swoon. Or perhaps something like this. Someone recently made a pillow that was very similar and super cute but I can't find it :/ Which do you like better? Or do you think I should make something totally different??
-Melissa
 |
| Timber & Leaf |
I'm thinking of combining these with some solids and a cream/natural background and doing another Swoon. Or perhaps something like this. Someone recently made a pillow that was very similar and super cute but I can't find it :/ Which do you like better? Or do you think I should make something totally different??
-Melissa
Wednesday, February 6, 2013
Binding Choices
Well, I've been quilting away and I have two baby quilts nearly finished! One is made from the scraps of Flurry from my Swoon quilt (which is still just a pile of nine finished blocks). One is a new one using Out To Sea.
I love the look of color-coordinated scraps together and how all the various reds, blues, and greens look cohesive from a distance. The bottom zig zag is hard to see because of the angle of the photo but it's just a mish-mash of HSTs. It is quilted with echoing zig zags. All that's left to do is bind it! I think I will be using one of the red prints I have some yardage of (it's for the Swoon quilt... but I think there's enough to do both).
My other project is a baby quilt with the Lucky Squares pattern from Sew Crafty Jess. I used some Out to Sea fat quarters I bought at Wexford Dry goods a few months ago.
It turned out soooooooooo cute! It was an exercise in perfecting my quarter inch seams. So that was a good lesson. There's a little bit of a fudge factor to this, but I never realized just how far off my quarter inch seams were until lately! This makes some other things make a lot more sense... ha
The back used the leftover squares I had cut. Not one was wasted! I quilted straight lines on either side of the ditch. It really complements the layout of the squares and creates a cute little grid on the back.
I've still got about a fat eighth of each print leftover. I don't know if I should save it for another quilt or use it for the binding. There's really nothing in my stash that matches any of the colors. Except white or some other neutral. Should I do pieced binding or just pick a solid and go with it?? Suggestions appreciated!
I'm linking up with WIP Wednesday over at Freshly Pieced!
-Melissa
 |
| Flurry Zig Zag |
My other project is a baby quilt with the Lucky Squares pattern from Sew Crafty Jess. I used some Out to Sea fat quarters I bought at Wexford Dry goods a few months ago.
 |
| Lucky Squares in Out To Sea |
It turned out soooooooooo cute! It was an exercise in perfecting my quarter inch seams. So that was a good lesson. There's a little bit of a fudge factor to this, but I never realized just how far off my quarter inch seams were until lately! This makes some other things make a lot more sense... ha
 |
| The back of my Lucky Squares quilt |
I've still got about a fat eighth of each print leftover. I don't know if I should save it for another quilt or use it for the binding. There's really nothing in my stash that matches any of the colors. Except white or some other neutral. Should I do pieced binding or just pick a solid and go with it?? Suggestions appreciated!
I'm linking up with WIP Wednesday over at Freshly Pieced!
-Melissa
Wednesday, January 23, 2013
The T-Shirt Quilt - Part 1
The first quilt I EVER made was a t-shirt quilt. I don't have a picture of it...it's at my mom's house somewhere and there's probably a cat sleeping on it. All my old t-shirts and tanktops were cut into squares. Unfortunately, I used a CD jewel case as a template to draw the squares. They aren't a perfect square. I also traced the template with a permanent marker. That smell doesn't dissipate very quickly. Plus jersey fabric is REALLY difficult to sew with. I pressed all of the seams open. I don't even want to try to remember how I did the binding - it was certainly a disaster. My second quilt was a much larger t-shirt quilt, it covers my twin-size bed at my mom's. Sophie sleeps on it. I never finished it - it's sewn together but the binding never made it on. And neither of them is quilted, I just tied them with yarn. But whatever, it was a learning experience. And I was SO proud to have made a quilt! And I swore I'd never make another t-shirt quilt ever again.
Until last year when a good friend of mine from college talked me into making one for him. He lost his brother to cancer and had a pile of his t-shirts that would be great in a quilt. After doing some research online, I decided to take it on! Not only do I have a lot more knowledge about quilting and sewing (13 years after the first t-shirt quilt disaster), there's so much info on the internet. Fusible stabilizer!? 12-inch squares cut using a 12.5-inch perfectly square ruler!? Chalk pencils!? Wow this quilt should be cake.
When I got the shirts, the collars and sleeves had been cut off and they'd been washed. All I had to do was iron on the stabilizer then use my big square ruler to cut out the blocks. I was even provided with the layout of the t-shirts and color selections for the sashing, backing, and binding :) Cutting was a little scary, mostly just on the hockey jersey. It's pretty much completely not replaceable. That was the one that HAD to be cut perfectly on the first try. Unlucky for me, the number was sewn on a little wonky... but it turned out okay :)
The sashing went on quickly and really brought it all together nicely!
Now basting a quilt this big and heavy is a pain. Lately I've been doing so many small projects and spray basting. The pins had to come out for this! I spent a few hours at the office with two big tables pushed together, smoothing and clamping and pinning...
The owner of this quilt lives in Philly and goes to at least a few Flyers games every year (although he's actually a Bruins fan), so appropriately, I spent Saturday afternoon watching the Penguins crush the Flyers and quilting this quilt :)
Initially, I'd planned to just do an all-over meandering/stippling quilt pattern. Well, I wasn't too sure about getting through that hockey jersey in the middle (the jersey itself is no big deal, but the numbers are pretty stiff/heavy) and the quilt was SO HEAVY I don't think the FMQ would've turned out too well. Plus this needs to be more masculine than that. So I opted to outline the sashing. But then the quilting was spaced too far apart for the batting so I went corner to corner on each block and made a bunch of diamonds.
I used an invisible thread on the top since there was so much light and dark and a matching green thread on the back. I think I might go back and outline the "13" in the hockey jersey since I didn't quilt through it.
Well it hasn't been cake, but it's coming together nicely. It's been a work-in-progress since last spring, but I'm hoping to have it done by the end of February. All that's left to do is put the binding on!
Linking up with WIP Wednesday at Freshly Pieced!
-Melissa
Until last year when a good friend of mine from college talked me into making one for him. He lost his brother to cancer and had a pile of his t-shirts that would be great in a quilt. After doing some research online, I decided to take it on! Not only do I have a lot more knowledge about quilting and sewing (13 years after the first t-shirt quilt disaster), there's so much info on the internet. Fusible stabilizer!? 12-inch squares cut using a 12.5-inch perfectly square ruler!? Chalk pencils!? Wow this quilt should be cake.
 |
| A stack of t-shirt blocks. |
When I got the shirts, the collars and sleeves had been cut off and they'd been washed. All I had to do was iron on the stabilizer then use my big square ruler to cut out the blocks. I was even provided with the layout of the t-shirts and color selections for the sashing, backing, and binding :) Cutting was a little scary, mostly just on the hockey jersey. It's pretty much completely not replaceable. That was the one that HAD to be cut perfectly on the first try. Unlucky for me, the number was sewn on a little wonky... but it turned out okay :)
 |
| All 25 stabilized and cut blocks laid out on the floor, all ready for sashing! |
 |
| Completed quilt top. |
 |
| Pin basting! That spoon is handy - it opens/closes all the pins so I don't get hurt! |
Initially, I'd planned to just do an all-over meandering/stippling quilt pattern. Well, I wasn't too sure about getting through that hockey jersey in the middle (the jersey itself is no big deal, but the numbers are pretty stiff/heavy) and the quilt was SO HEAVY I don't think the FMQ would've turned out too well. Plus this needs to be more masculine than that. So I opted to outline the sashing. But then the quilting was spaced too far apart for the batting so I went corner to corner on each block and made a bunch of diamonds.
 |
| Quilted and ready for binding! |
 |
| Three extra blocks were chopped up for the back. |
Linking up with WIP Wednesday at Freshly Pieced!
-Melissa
Wednesday, January 16, 2013
FMQ: Getting Into the Groove
So I "finished" my Groove quilt back in the fall. But it wasn't really finished. The binding was machined to the front but not sewn down to the back. And it was just so... plain. All solid colors (don't get me wrong, it was fun to play with all solids) but the stitch-in-the-ditch quilting just wasn't doing it for me.
My biggest quilting "resolution" for this year is to work on my FMQ skills! That's just what the Groove quilt needs - some texture! Much like many of the other Groove quilts you'll see floating around, I decided to use a different free motion quilting pattern in each color area of the quilt.
So far the yellow is full of echo paisley (it's almost echo shell, it doesn't quite come back to the origin enough... but whatever, I like it anyway!) and the orange has the start of some pebbles (yeah, I once said I was done with pebbles, but these ones will be bigger and in a smaller area).
The only issue I'm still really having is getting the tension right on the back. I slowed my hands down so I'm not getting insane loopies on the back, but the tension is still a little wacky. I've just been cranking the dial up to like 6 and it seems to be helping. Does anyone else find that that's okay? I had to do that before and thought it was the crappy thread I had at the time - now I am doing that with Aurifil.
I'll have to master three more patterns to be able to finish this quilt! I'm thinking swirls, wood grain, and something else. I don't really want to do anything angular, it seems like curves fit this curvy quilt! Any suggestions for the final FMQ pattern on this one?
Linking up to WIP Wednesday at Freshly Pieced!
Melissa
 |
| It was like 70 degrees on Sunday - that's the only time a hammock is appropriate in January! |
My biggest quilting "resolution" for this year is to work on my FMQ skills! That's just what the Groove quilt needs - some texture! Much like many of the other Groove quilts you'll see floating around, I decided to use a different free motion quilting pattern in each color area of the quilt.
 |
| Echo paisley in the yellow portions of my Groove quilt |
So far the yellow is full of echo paisley (it's almost echo shell, it doesn't quite come back to the origin enough... but whatever, I like it anyway!) and the orange has the start of some pebbles (yeah, I once said I was done with pebbles, but these ones will be bigger and in a smaller area).
 |
| Pebble quilting in the orange areas - it looks like a Band Aid in this picture |
The only issue I'm still really having is getting the tension right on the back. I slowed my hands down so I'm not getting insane loopies on the back, but the tension is still a little wacky. I've just been cranking the dial up to like 6 and it seems to be helping. Does anyone else find that that's okay? I had to do that before and thought it was the crappy thread I had at the time - now I am doing that with Aurifil.
 |
| You can see that the tension is a little wonky, especially in the orange-on-cream area |
I'll have to master three more patterns to be able to finish this quilt! I'm thinking swirls, wood grain, and something else. I don't really want to do anything angular, it seems like curves fit this curvy quilt! Any suggestions for the final FMQ pattern on this one?
Linking up to WIP Wednesday at Freshly Pieced!
Melissa
Sunday, January 13, 2013
City of Bridges
Several of us from the Pittsburgh Modern Quilt Guild have been busy working away on our Madrona Road Challenge projects! We decided that our challenge would be a theme based on the story that accompanies the fabric line - we settled on roads and bridges. I've always had ideas for bridge quilts floating around in my head and I sat down with a friend of mine and came up with a pretty fun design!
I had a dimensioned drawing of my original idea but as I was putting the top together, I made some last minute changes and improvised some portions of the quilt. It was pretty liberating! I've never really done any improve piecing outside of a meeting workshop setting.
We had some beautiful weather this weekend, so it was a great opportunity to get a few pictures!
The finished dimensions are about 40.5" by 46.5" - it's a little crooked though...oh well! The first finish of 2013 turned out pretty well :) I'm off to work on a t-shirt quilt for a friend and keep on working on my FMQ skills with my Groove quilt!
I had a dimensioned drawing of my original idea but as I was putting the top together, I made some last minute changes and improvised some portions of the quilt. It was pretty liberating! I've never really done any improve piecing outside of a meeting workshop setting.
We had some beautiful weather this weekend, so it was a great opportunity to get a few pictures!
 |
| City of Bridges - font |
 |
| City of Bridges - Back |
 |
| City of Bridges - FMQ closeup |
 |
| City of Bridges - finished quilt! |
The finished dimensions are about 40.5" by 46.5" - it's a little crooked though...oh well! The first finish of 2013 turned out pretty well :) I'm off to work on a t-shirt quilt for a friend and keep on working on my FMQ skills with my Groove quilt!
Friday, January 4, 2013
Score!
I was working about an hour or so away yesterday and decided to take the long way home to stop at a LQS that I hadn't been to yet. They had a nice variety of fabrics. In the interest of supporting a local business (and adding to the stash!) I picked up a charm pack of Serenade. Then I found $6 one yard cuts, buy 3 get one free. Who can pass that up!? Especially the circuit board print! And when I get home today there should be a massive box of Bella solids waiting for me :)

Wednesday, January 2, 2013
Getting Back on Track
I woke up today thinking it was Monday and dreading going back to work. After two long weekends and a 3-day week of only half-assing it, I don't think I could handle a full week of work. Oh wait, it's WEDNESDAY! Everything is instantly a little shinier. Oh and did I mention I saw a brief glimpse of the sun as I got to my parking space? Score.
That means I need to write up a WIP Wednesday post since I've been neglecting the blog for so long.
So for the past couple of months, I was just working on cranking out Christmas gifts and working on my Swoon quilt. Now Christmas has passed and I've got my Swoon blocks all finished. They still need to be sashed. I'm debating whether I want to just put them into storage and finish up some older, more spring-like WIPs or just get the top done and wait to baste/quilt it when I'm feeling more Chirstmassy. On top of that, I used my Flurry scraps to make a zig-zag baby quilt (with those bonus HSTs you cut off while making the Swoon blocks) and started an EPP project with diamonds and hexagons and jewels. Although staring at Flurry prints is getting old (it's been a few months now and Christmas is over...but I do LOVE the prints, it's just time for a change!)
My biggest project for the past week has been the Madrona Road Challenge. A few of us from the Pittsburgh MQG are participating. Our theme is "roads and bridges" based on reading the cute little story that accompanies the Madrona Road collection. A friend of mine (who just happens to design bridges for a living) helped me come up with an awesome sketch which I turned into a pattern. Then it was off to AutoCAD to draw it all up neatly and dimension everything out. And then I figured out how to tile patterns in Photoshop (what a proud moment for me!) - that way if you just scan the fabric, you can tile it and see what it's going to look like. The scale wasn't quilt right though.
So on Saturday, I got together with a fellow challenge participant and we brainstormed and planned out our quilts (it's always nice to have feedback from someone to help smooth out the sections that are bothering you!). The top was finished basically in an evening and then I got ambitious and sewed batting scraps together, cut and ironed some backing fabric, and found an almost-empty spray basting can at like 10 pm and got it all basted. Then I couldn't stop and quilted about 1/4 of it before finally deciding it was time to go to bed. New Years Eve day I got about 3/4 of the way through the quilting. Anyhow, I will give you a little sneak peak but I'm going to wait until later to reveal the full quilt! Plus it still needs to be finished up!
So that's my first WIP Wednesday post for 2013! I'm linking up to Freshly Pieced as usual - take a look and get some inspiration for your 2013 WIPs!!
-Melissa
That means I need to write up a WIP Wednesday post since I've been neglecting the blog for so long.
So for the past couple of months, I was just working on cranking out Christmas gifts and working on my Swoon quilt. Now Christmas has passed and I've got my Swoon blocks all finished. They still need to be sashed. I'm debating whether I want to just put them into storage and finish up some older, more spring-like WIPs or just get the top done and wait to baste/quilt it when I'm feeling more Chirstmassy. On top of that, I used my Flurry scraps to make a zig-zag baby quilt (with those bonus HSTs you cut off while making the Swoon blocks) and started an EPP project with diamonds and hexagons and jewels. Although staring at Flurry prints is getting old (it's been a few months now and Christmas is over...but I do LOVE the prints, it's just time for a change!)
 |
| EPP Flowers/Stars... however you want to look at it :) |
The EPP project is great because I can work on it whenever. Tomorrow I am in the field for work - I have a feeling I will be spending a lot of time "watching" from my heated car (it's only going to be 15 degrees!) and it's nice to feel like you're accomplishing something while avoiding being cold! It occupied most of my down time when I went home for Christmas.
 |
| Sophie Fangs is less than thrilled that I'm sewing and not petting her. |
The only thing I'm regretting is using white thread - it shows through a little bit, especially on the darker colors. But whatever, it's hand made and that makes it obvious :) Perhaps when this is finished some day, I will try hand-quilting it. We'll see. I'm also playing with layout ideas in my head. The fabric scraps are only going to go so far. I might try floating the flowers in more white rather than connecting the points.
 |
| The white stitches show through on the seams... oh well, too late now! |
") |
| FMQing some echo paisley on my City of Bridges Quilt! |
So that's my first WIP Wednesday post for 2013! I'm linking up to Freshly Pieced as usual - take a look and get some inspiration for your 2013 WIPs!!
-Melissa
Subscribe to:
Posts (Atom)